Send Keyboard Input Action
[Professional Edition Only]
The Send Keyboard Input action "types" text into a window or control.

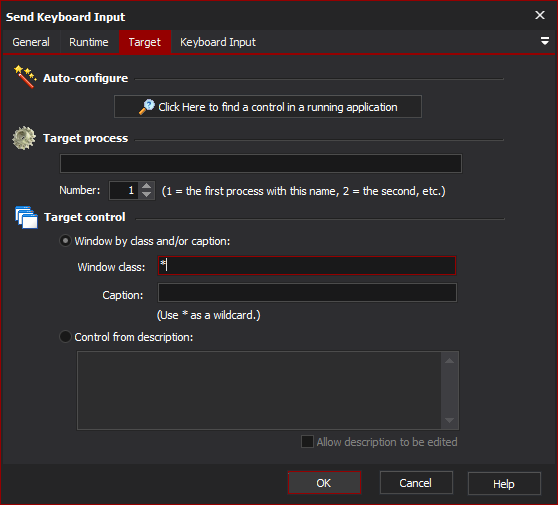
Target
Auto-configure
This is the recommended way to configure this property page. When you click on the "Click Here..." button, Automise is hidden and Find Control dialog is displayed.
While you search, Automise will place a red highlight rectangle around the control which is currently under the mouse pointer.
Navigate to a point over the control that you want to choose for the action, and Control-Click to select it. All of the other fields on the property page will be populated with a description of the control. In most cases, this is all you need to create a reproducible description of the target control.
However, you can fine tune the selection by editing each field on the property page. This is described in the Manual Configuration topic.
Target process
The name of the process that will be searched for to perform the mouse click on.
Number
The occurrence of the process that the mouse click will be performed. This is important as their may be multiple copies of the same application running at the same time.
Target control
Window by class and/or caption
Instructs the action that the windows class and caption options should be used in determining which control to select when performing the click.
Window class
The name of the windows class that the control is an instance of. Note that wildcards are allowed to help to enable a boarder selection of controls.
Caption
The display text shown on the control. Again wildcards work within this option value.
Control from description
Instructs the action to use the description when determining which control to click. The description entered will be matched to the display text of the controls in the selected process.
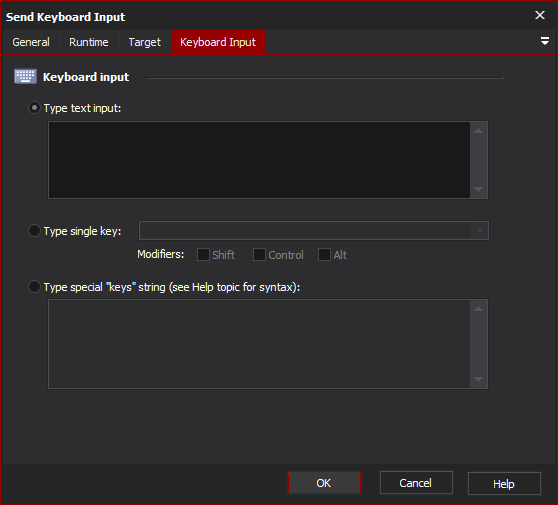
Keyboard Input

Keyboard input
Type text input
Select this option to type a string of normal characters (ie no special characters) to the target control. For example, this can be used to enter data into a text field.
You can also enter newline characters here, which will be sent as presses of the Enter key.
Type special key
Select this option to type a single key on the keyboard. This can be used to type a non-printing character such as a backspace, tab, escape, etc. or to perform a keyboard shortcut such as Control-A.
Select modifiers (Shift, Control, Alt) to simulate holding a key down while the special key is pressed.
Type special "keys" string
Select this option to send a string of special keys to the target control. The format of this string is the exactly the same as for the Visual Basic SendKeys Sub, or the .NET System.Windows.Forms.SendKeys class.
To specify multiple keys, type them in sequence.
For "printable" characters, you can just enter the character (ie for the 'A' key, enter "A".)
The exceptions to this rule are the characters +, , %, ~, (, ), . To type any of these characters literally, surround them in curly braces, ie {+}, {}, {%%}, {|}, {(}, {)}, {{} or }.
For special keys, you can use the following aliases:
| Character | Alias |
|---|---|
| Backspace | , or |
| Break | |
| Caps Lock | |
| Delete ("Del") | or |
| End | |
| Enter ("Return") | or ~ |
| Escape ("Esc") | |
| Help | |
| Home | |
| Insert ("Ins") | or |
| Num Lock | |
| Page Down | |
| Page Up | |
| Scroll Lock | |
| Tab | |
| F1 through F16 | ... |
| Keypad + | |
| Keypad - | |
| Keypad / | |
| Keypad * | |
| Arrow Keys (Up, Down, Left, Right) |
, , , |
To apply modifiers (Shift, Alt, and Control) to a key press, precede the key name with one of the following modifier characters:
| Modifier Key | Modifier Character |
|---|---|
| Control | ^ |
| Shift | + |
| Alt | %% |
Modifier Key Modifier CharacterControl ^Shift +Alt %%
"Alt" is actually a single % sign, but it is escaped as %% because a single % sign indicates a variable.
For example, to specify Control-A, enter "^A".
To apply a modifier key to multiple key presses at once, enclose those keys in parentheses. For example, to specify "Control-A, then Control-Home, then Control-Z", enter "^(AZ)".