Signing Certificates
The Signing Certificates page in Signotaur's Admin section (Signing Certs in the sidebar) allows administrators to manage the certificates available to the Signotaur client for code signing and document signing.
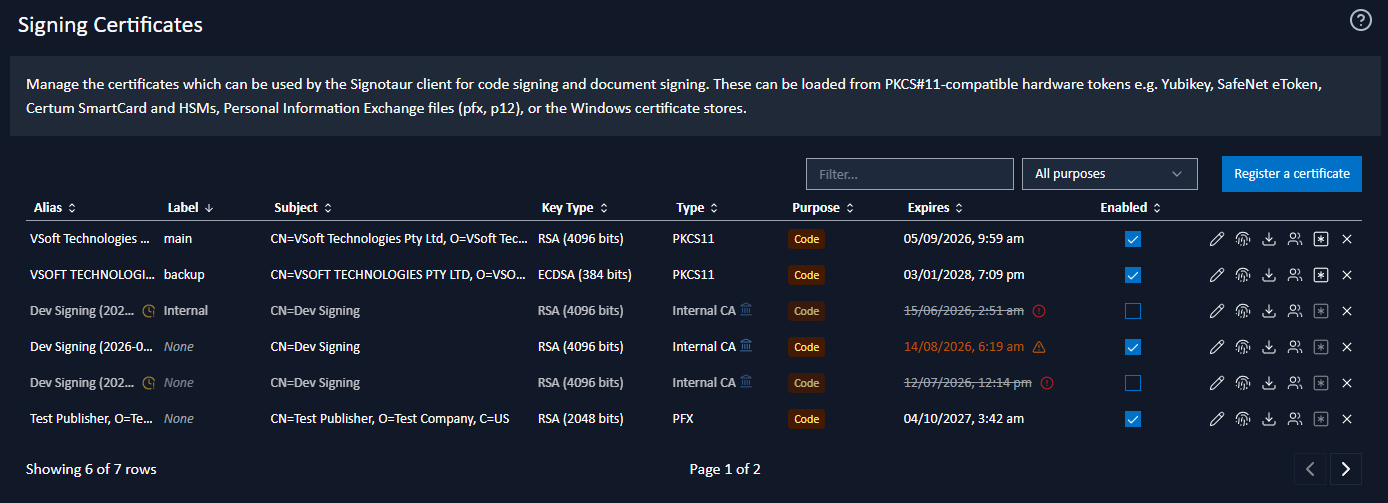
A sortable, filterable table lists all registered signing certificates. You can search it by alias, label or subject.
Certificate Table Columns
- Alias: An automatically generated descriptive name for the certificate (for example, "CodeSigningCert (2027-12-31)"). An amber clock marks a replaced registration; see Replaced Certificates below.
- Label: A user-defined identifier for selecting the certificate from the CLI (for example, "production" or "test"); see Certificate Selection below. An orange warning triangle marks a label shared by more than one active certificate; see Label Duplication Warnings.
- Subject: The certificate's subject distinguished name.
- Key Type: The certificate's public-key algorithm and key size (for example,
RSA (2048 bits)orECDSA (256 bits)). - Type: The certificate's source or storage method. Managed certificates show Internal CA or ADCS; other certificates show PFX, PKCS11, UserStore or SystemStore. See certificate management.
- Purpose: Whether the certificate can be used for code signing, document signing or both; see Certificate Purpose below.
- Expires: The certificate's expiry date, colour-coded as it approaches; see Expiry Warnings below.
- Enabled: Whether the certificate is available for signing. A red padlock means it has been locked after failed PIN attempts. Hover over the padlock for details, then update the password to unlock it. The same state appears read-only on My Certificates.
- Actions: The operations available for the certificate.
For supported certificate types, key algorithms and sources, see Code Signing Certificates and Document Signing Certificates.
Expiry Warnings
The Expires date changes colour as expiry approaches. Hover over it to see the remaining time in words.
| Time to expiry | How it appears |
|---|---|
| More than 21 days | Plain text |
| 21 days or fewer | Amber, with a warning triangle |
| 10 days or fewer | Orange, with a warning triangle |
| 4 days or fewer | Red, with a warning circle |
| Already expired | Struck through and greyed, with a red warning circle |
Expired entries are dimmed in the table. An expired certificate cannot be used for signing and must be renewed or replaced.
Certificate Purpose
A certificate can be registered for code signing, document signing or both. The Purpose column identifies each supported purpose as Code or Doc.
Above the table, Filter by certificate purpose narrows the list to All purposes, Code Signing or Document Signing.
The Purpose column and purpose filter appear only with an Enterprise licence. See Editions & Licensing.
Signotaur determines the purposes from the certificate. A certificate that supports neither code signing nor document signing cannot be registered.
Adding a New Certificate
To add a certificate, click Register a certificate. The registration dialog opens for you to enter or select the certificate details.
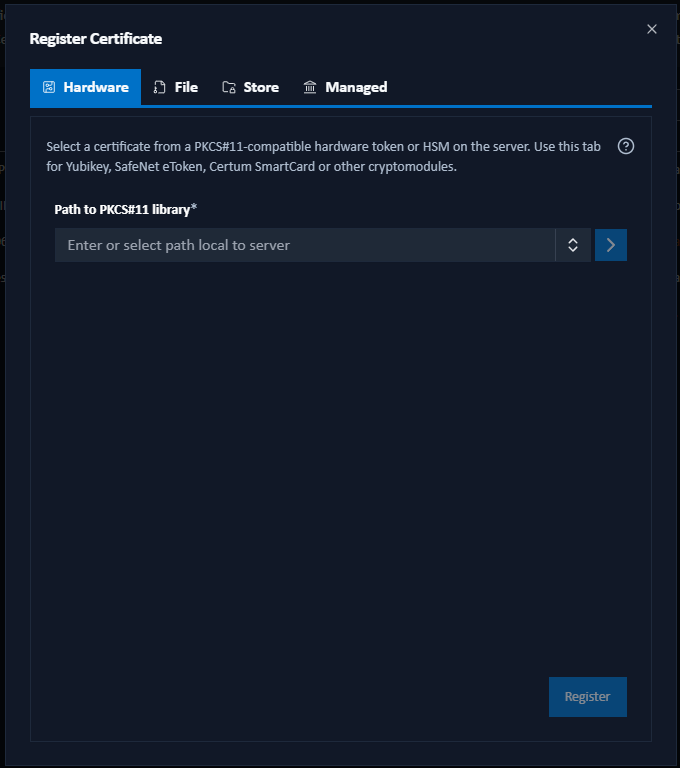
Signotaur supports four certificate sources, each on its own tab:
- Hardware: Loaded from a server hardware token or HSM via PKCS#11, a cryptographic token interface standard.
- File: Uploaded from a PFX (Personal Information Exchange) file containing the certificate and private key.
- Store: Certificates stored in the Windows Certificate Store.
- Managed: Certificates issued through Signotaur's certificate management system. They are renewed automatically.
Click a heading for instructions on adding that type of certificate.
The Managed tab requires an Enterprise licence. The File, Store, and Hardware tabs are available in every edition. See Editions & Licensing.
Registering a Document-Signing Certificate
Registering and using a document-signing certificate requires an Enterprise licence:
- With an Enterprise licence, the certificate pickers include certificates for code signing or document signing.
- Without an Enterprise licence, certificates that support only document signing are not shown.
A certificate that supports both purposes can still be registered and used for code signing without an Enterprise licence.
If the Enterprise licence lapses, registered certificates that support only document signing are hidden, not deleted. They reappear automatically when an Enterprise licence is restored, without needing to be registered again.
Replaced Certificates
A registered signing certificate becomes replaced when its underlying managed certificate is renewed and the new certificate takes its place. An amber clock in the Alias column marks the replaced registration. Its tooltip identifies the replacement and, when auto-unregister is enabled, shows when the old registration will be automatically disabled or removed.
Editing a Certificate
 To change a certificate's alias or label, click its Edit button.
In the dialog that opens, you can change:
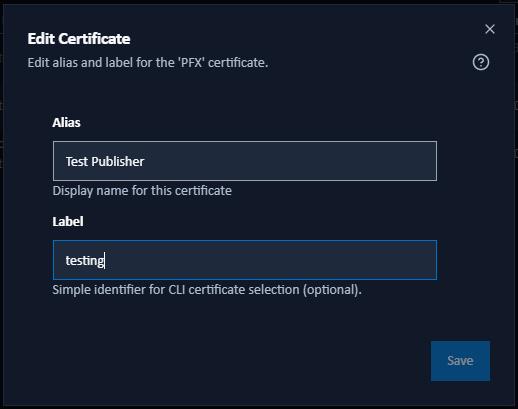
- Alias: The certificate's descriptive display name. It must be unique across all registered certificates.
- Label: An optional, simple identifier for selecting the certificate from the CLI. Multiple certificates can share a label, which is useful during certificate renewal.
Label Duplication Warnings
When you edit a certificate's label, the dialog warns you if other certificates use the same label:
- Orange Warning (⚠️): Multiple unexpired certificates share the label. This may make CLI certificate selection ambiguous. Signotaur automatically selects the enabled, unexpired certificate with the latest expiry date.
- Grey Warning: Only expired certificates share the label, so there is no selection conflict.
Note: Label matching is case-insensitive, so "Production" matches "production".
Certificate Selection via Labels
Labels provide a convenient way to select certificates in the SignotaurTool CLI without updating scripts whenever a certificate is renewed.
Benefits:
- Simplified CI/CD: Use
--label productioninstead of updating thumbprints after renewal - Automatic Selection: When multiple non-expired certificates share a label, the one with the latest expiration is automatically selected
- Simpler renewal: Give the replacement certificate the same label so existing scripts continue to work.
Example Workflow:
- Current certificate has label "production", expires 2025-12-31
- Obtain renewal certificate, expires 2027-12-31
- Add renewal certificate to Signotaur with label "production"
- Both certificates are now available (overlap period for testing)
- After expiration of old certificate, new certificate is automatically used
- No changes needed to CI/CD scripts using
--label production
See Sign Command - Certificate Selection for CLI usage.
Enabling/Disabling a Certificate
To make a certificate available or unavailable for signing, select or clear its tick box in the Enabled column.
Viewing a Thumbprint
 To view a certificate's thumbprint, click the Show Thumbprint button next to its entry. A dialog will open where you can view and copy the thumbprint.
Downloading the Public Certificate
 To download a public certificate, click its Download button. The Download Certificate dialog lists the available certificates in the chain and provides PEM and DER downloads for each one.
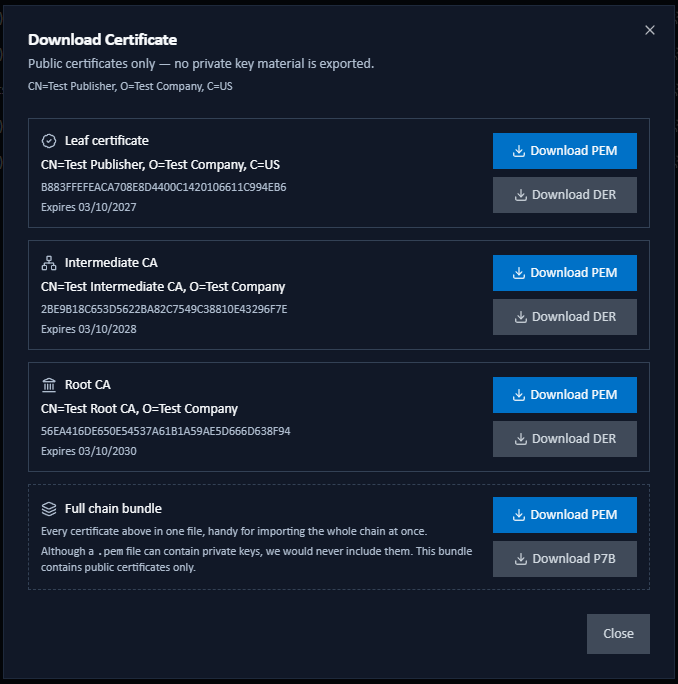
- Downloads contain public certificates only; private keys are never exported.
- Use Download DER (
.cer) for Windows tools and services that require binary certificates. Use Download PEM (.crt) for text-based tools, OpenSSL and Linux trust stores. Both contain the same public certificate. - When more than one certificate is available, the Full chain bundle card provides the complete chain as PEM (
.pem) or PKCS#7 (.p7b). - If Signotaur cannot assemble the complete chain on the server, for example because the certificate's issuer is not installed locally, the dialog still shows every certificate it could resolve and explains the gap.
For platform-specific guidance on installing a root certificate as a trust anchor, see Trust Distribution.
Assigning User Access
 To assign a certificate to users, click its Assign User Access button.
In the dialog which opens, use the dropdown to select one or more non-admin users to assign the certificate to, then click Save.
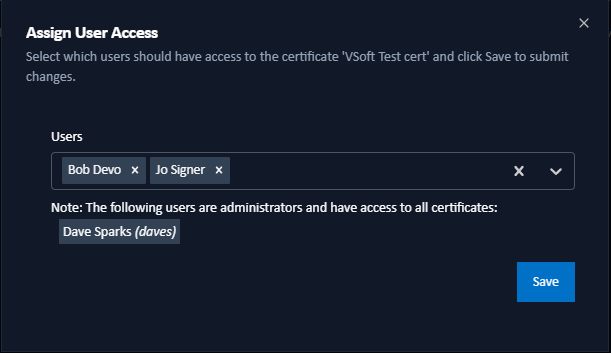
Note: Only non-admin users need to be assigned certificates because administrators automatically have access to all certificates.
Updating the Password
 PKCS#11 certificate passwords can expire. To update a certificate's registered password, click its Update Password button.
In the dialog that opens, enter the password and a password confirmation, then click Save.
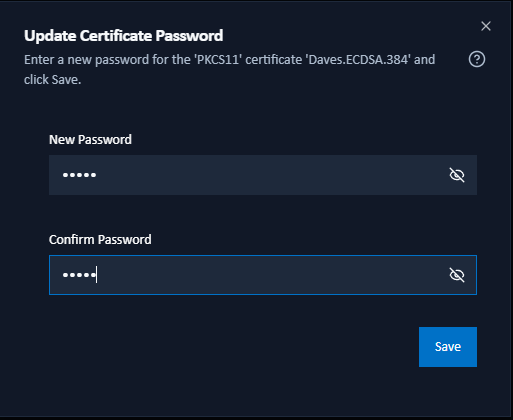
Note: Passwords can only be updated for PKCS#11 certificates.
Deleting a Certificate
 To delete a certificate, click its Delete button, then confirm that you want to remove it permanently.