Additional Build Information
What are Builds?
At the most basic level, builds are a set of actions that are executed sequentially to achieve a certain goal. Each build belongs to a configuration and the actions that run during the build are defined in a build's parent configuration. For example, a simple configuration stage may include the following actions.
- Create an output folder in the agent workspace using the Create Directory Action.
- Build your project using the MSBuild Action and save the results into the output folder.
- Run unit tests over your project using the NUnit Action.
Every build uses its parent configuration as a blueprint. Everything relating to builds is defined on the configuration. You can think of a build as the execution of its parent configuration.
Builds can consist of multiple stages and each stage is executed on one of Continua's Agents. Before a stage is executed, the Continua server selects an agent to run the stage and sends all required information to the agent. This agent then runs all the actions on the stage before it sends any relevant information back to the server. For more information on how the server and agents work, check out the Distributed Architecture page.
Automatically Triggering Builds
Triggers can be created on a build's configuration that will automatically 'trigger' a build on certain events. Triggers can be broken up into 3 sections:
- Time Triggers: These triggers will fire a build on a specific day or at a specific time.
- Repository Triggers: These triggers are linked to your Version Control Systems (VCS) and they will fire a build when changes are detected in your VCS.
- Build Completed Triggers: These triggers will automatically start a build when another build has either finished successfully or failed.
Manually Starting Builds
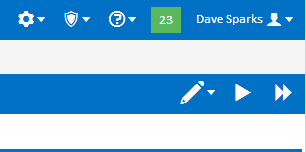
Manual builds can also be queued at any time through the Continua CI interface. They can be started from any Configuration or Build page, so choose the configuration you want to build and navigate to that configuration. Once there you should see the Queue Build and Queue Build Immediately buttons in the Configuration Menu(as shown below).
Queue Build
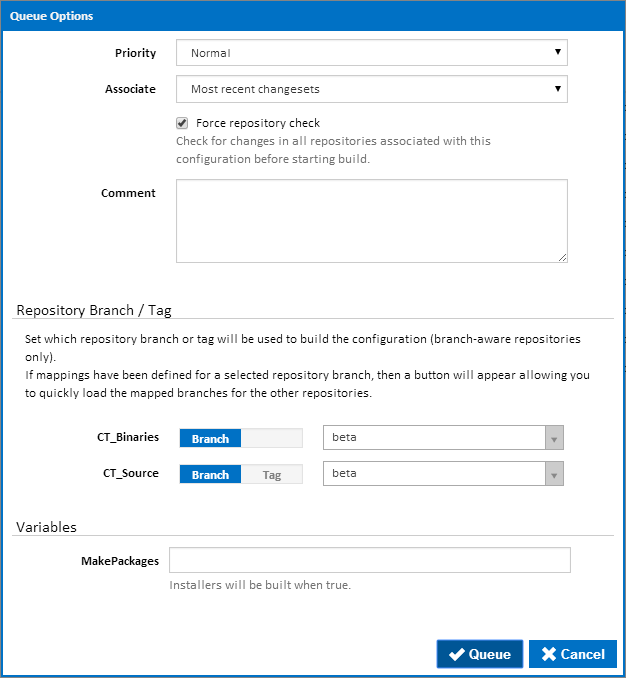
Priority
This specifies the priority of the build. Priority determines which build to execute next if there are more builds queued than there are available agents. This can be set to either high, normal or low with high given the most priority.
Associate
This specifies which changesets should be associated with this build for all repositories on this build.
There are two options for Associate:
- Most recent changesets: This will only link the latest changeset for each repository to the build.
- All changesets since last successful build: This will add all the changesets that have occurred in all the repositories since the last successful build.
For example, let say my configuration is linked to a repository called myRepository. Since the last time a build was executed successfully, I have made the following checkins to the source code in myRepository:
- Fixed annoying deadlock bug. issue #3199.
- Minor UI fixes
- fixed show stopper bug #544
With these checkins, lets assume that Fixed annoying deadlock bug. issue #3199 is the latest checkin to be made.
What I have selected for Associate will change the latest changesets that I will see associated with my build.
For this example, once the build has finished running, if I check the latest changes made in myRepository, I will see the following checkins:
- With Associate set to 'Most recent changesets': Fixed annoying deadlock bug. issue #3199.
- With Associate set to 'All changesets since last successful build': Fixed annoying deadlock bug. issue #3199, Minor UI fixes, fixed show stopper bug #544.
Force repository check
With this option ticked, Continua will check the repository for any new changesets before starting the build. This is useful if you know that you already have the latest changeset and want to speed up build initialisation
Comment
Any comments added to this property will attach a comment to build.
Repository Branch / Tag
For branch-aware and/or tag-aware repositories you can specify the branch or tag to be used in the build. One use-case of this feature is being able to perform a build of specific release tags (as used in branching models such as gitflow). This option is specified for each repository linked to the build.
The branch boxes are loaded with the default for the configuration if this is specified in the repository mappings.
Variables
Configuration variables that have been set on the build's parent configuration can have their values set when manually queueing a build. Note that only configuration variables can be set when queueing a build.
Queue Build Immediately
Clicking Queue Build Immediately button will queue a build in exactly the same way as the Queue Build button however all the build options (listed above) will be preset.
Queue Build Immediately will always set the following options:
- Build Priority: Normal
- Associate: Most recent changesets
- Comment: No comment set
- Repository Branch: All repository branches will be set to their default.
- Variables: All variables will be set to their default values.
Requeuing Builds
Sometimes a build may fail due to an offline network resource, or some logical error in the stage workflow. Previously run builds can be run again using the same changesets, variables and queue options.
Navigate to the build you want to run again. Once there you should see the Requeue Build button with a linked dropdown menu and Requeue Build Options button in the Build Menu(as shown below).
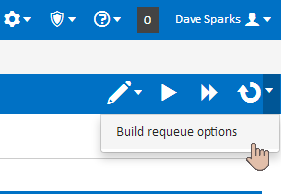
Clicking Requeue Build button will queue a build with the same changesets, variables and queue options as this build. Note however that any changes to the configuration such as stage actions or repositories since the previous build ran are taken into account and used for the new build.
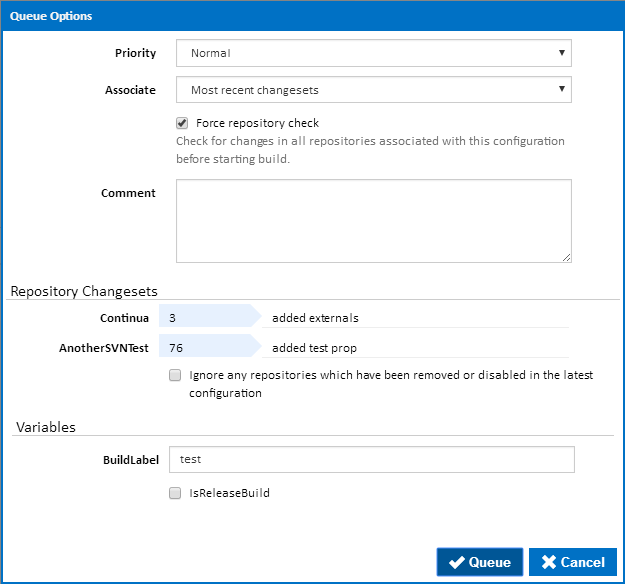
To change variable values and options, click on the Requeue Build Options button. This will open a dialog allowing you to make changes before requeuing the build.
Limiting Who Can Manually Start Builds
Security can be added to a build's configuration that can limit which users are able to manually start a build. Only users that have the Start Build permission can manually start a build. Check out the Roles & Permissions section for more information on permissions.
The Build Queue
The Build Queue is where all builds wait until an agent that can run the next stage in the build becomes available. An agent is only eligible to run a stage if the agent has all the required applications installed. Basically an agent can only run a stage if it has every application that is needed to execute every action on that stage.
Determining Build Bottlenecks
If there are multiple builds waiting for an agent, Continua will use the Build Priority property of the build to determine which build will be sent to the agent.
Queue Conditions
Queue Conditions can be created on a build's parent configuration which control when a build can leave the queue and begin executing. If a queue condition has not been met then the build will sit on the queue indefinitely until that queue condition has been met.
Stage Awaiting Agent
If you are frequently seeing builds waiting for available agents then there are more concurrent builds running then there are agents. By adding additional agents to Continua you should see a decrease in the number of builds that are waiting for an agent. Note that additional agents are only available to customers that have purchased additional concurrent builds for their Continua CI instance.
Stopping Builds
All builds can be stopped mid execution. Regardless of what stage a build is currently executing, the build can be stopped immediately by clicking Stop Build on the build page or Cancel/Stop on the configuration page. When a build has been told to stop while executing an action, the Continua agent will attempt to stop the current action. The agent will not run any further actions for the build, including syncing the agent back to the server. Continua treats stopped builds as discarded builds and will simply stop any further actions from occurring.
Only users with the Stop Build permission can manually stop builds.
Cancelling Builds
Cancelling a build is similar to stopping a build however only builds that are on the build queue can be Cancelled. A cancelled build will stop trying to find an agent and will be taken off the build queue immediately.
Only users with the Stop Build permission can manually cancel builds.
Quiet Periods
Quiet Periods allow you to leave a build on the queue for a set period of time and it will listen for any additional changesets being added to a triggering repository. Quiet Periods can be associated to repository triggers and they allow you to specify a time window where any additional checkins to a repository will be added to the currently queued build rather then creating a new build per changeset.
You can end a quiet period early by clicking End Quiet Period on the build details page or by clicking the End Quiet Period button on the configuration page (Blue clock button as shown below). By ending a quiet period, the build will no longer wait for additional changesets and will put the build on the queue to wait for the next available agent.

For more information regarding repository triggers and quiet periods, see the Repository Triggers page.
Promoting Stages
Stages can be setup so that they will only execute if they are manually promoted through Continua. If a build reaches a promoted stage successfully then the build is considered a success and it is removed from the build queue. Once the build has been promoted to the next stage it will be placed back on the queue and will wait for the next available agent.
Promoting stages is designed so that you can limit the final stages of a build so that they can only be run by certain users. For example you may setup your configuration so that your build includes a Deploy stage that can only be executed manually by your lead developer.
Setting a stage to be manually promoted can be done by unchecking the Automatically promote to the next stage option on the stage directly before the stage that requires manual promotion. This option can be found by editing the appropriate stage through the Stages section of the Configuration Wizard. By unchecking this option you are telling Continua to stop at the current stage and not move on to the next stage.
Builds can be promoted by clicking the Promote button on the builds page (As shown below).
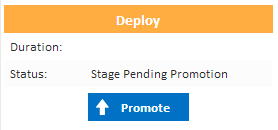
Only users with the Promote Build permission can promote builds.
Advanced Stage Control
Promoting stages can be used to limit which users can finish a build process, however additional work can be done to ensure certain builds never reach certain stages. In the example above you have a Deploy stage that can only be executed by your lead developer. Lets say that you also want to limit which builds can reach the Deploy. For example, you should only ever deploy builds that were triggered by a release branch checkin. This scenario can be achieved by creating an If Action that checks if the current repository branch is NOT the release branch. If it is not the release branch then we run a Stop Action that ends the current build. These actions should be placed at the end of the stage that executes immediately before the Deploy stage. Stopping a build will end the build immediately and will be considered as a successfully completed build.
Tagging Builds
Continua Builds can be tagged with additional information that may be useful for your Continua users. By tagging builds you can group together builds into categories. Once a build has been tagged, you can click on that tag which will show all builds that share that tag.
Builds can be tagged by two different methods:
- Automatically tag builds: Builds can be tagged automatically in the build process with the Tag Build Action.
- Manually tag builds: Builds can be tagged manually from the configuration page and the build details page. Manually tagging a build will bring up the Enter Tags dialog (As shown below).
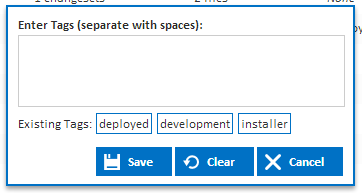
Only users with the Tag Builds permission can tag builds.
Pinning Builds
Continua Builds can be pinned by a user which marks the build as a special build. When pinning a build you can leave a comment describing why the build is pinned and why it is important. For example, you may pin all your release builds so that you always have a record of the builds that were released into production. When a build is pinned, Continua will record who pinned the build and when it was pinned.
When you are pinning a build you are telling Continua that this build is special and that it should never be deleted. Regardless of the Cleanup, this build will always remain in the Continua environment.
Builds can be pinned and unpinned on the build details page by clicking the [Pin Build]/[Unpin Build] links (As shown below) or on the configuration page.
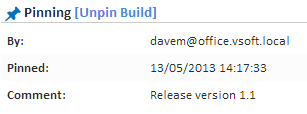
Pinning a build is not permanent and any pinned build can always be unpinned.
Only users with the Pin/Unpin Build permission can pin and unpin builds.
Comments
Comments can be left on each build so that additional information can be attached to each build. For more information on comments, see the Comments page.
Build Pages
Each build has additional information you can view by switching to that tab. Here's a brief explanation of each tab.
Build Details - Shows a summary of the build, unit tests, changes, comments, tags and pinning.
Build Logs - A GUI for the build log. Lists each stage and action.
Unit Tests - If you've registered unit tests they'll be listed here in tabular format.
Artifacts - Any artifacts registered will be listed and viewable/downloadable here.
Changes - Changes to the Repositories linked with this Configuration and associated with the build.
Issues - If you've setup an Issue Connector, you'll see the issues extracted from your commit messages here.
Timeline - Lists every step of the build and a status message.
Comments - Lists all comments for the build.